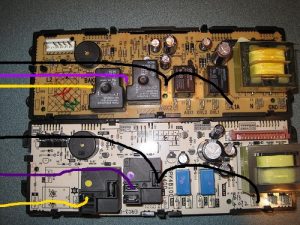
So the wall oven went out a while back. Well, sort of. It would work, then the digital display would code with an “F3” and start beeping. Then it would not turn on until it cooled down. With Thanksgiving looming it needed to get fixed. So onto the internet I went and after much searching came up with a couple of help posts and pinpointed the problem as either a bad thermostat sensor or a bad control board. I replaced the sensor, no luck. Still got the dreaded F3 after about 10 minutes. So then I tried to order the control board from Sears (it’s a Kenmore oven but made by GE) but the website said that it could only be replaced by a technician. Really? I can plug-and-play with the best of them! Then I found out why: The replacement board-or module-was wired up different. OK, so off I went searching for the alternate wiring schematic. After pouring through many fuzzy posts I finally came across a rather long-winded one that put me on the right direction. I located the part from a non-Sears vendor for about 2/3 the Sears price and popped it into the oven. It didn’t work right away but with a little fiddling Dean and I were able to sort it out. In the end it was a very easy fix. I don’t know what all of the mystery and fuss is about and so in the interest of clarity I’ve decided to post the proper hook-up, complete with pictures.

So, if you own a Kenmore or a GE oven that has the older control board, this is how the replacement is hooked up: The Purple (broiler) and Yellow (oven) wires plug in directly below their respective dots. The Black wire with its two connectors plugs into the broiler relay to the right of the Purple wire and to the L1B on the board, just as before. So what’s the difference? Why is the L1A missing and why not plug one black plug into the slot on the oven relay? Because the L1B powers the board (Black is a “hot” wire), all except for the relays . The oven relays are powered by the L1A on the old board and both relays get their power directly from this connector hidden from view on the other side. The new setup simply has the L1A connector on the broiler relay instead of the board. The oven relay is connected to it by the board. So, only the broiler relay get the Black wire. If you plugged the black wires into both relays, then the board would have no power-as we found out.
There. Fully explained. Now it’s time to go work on the turkey which is not going into the newly repaired oven but onto the grill to get smoked.
